
Platform Module - Security and Log In
The Platform module is the underlying container of logic required for all the other modules to operate. It contains the Security and Rules Engine components and the Platform Tool Bar functionality.
This module provides integrated security for all modules in the platform. The module is able to integrate itself within windows domain security architecture to minimize repeated User logins. If required the module will retrieve the User id logged in to windows and will compare it to its security database allowing automated logon if there is a match.
>>>> NOTE: This section will change for the web system. So none of this content was rewritten yet.
|
This is how to log in....
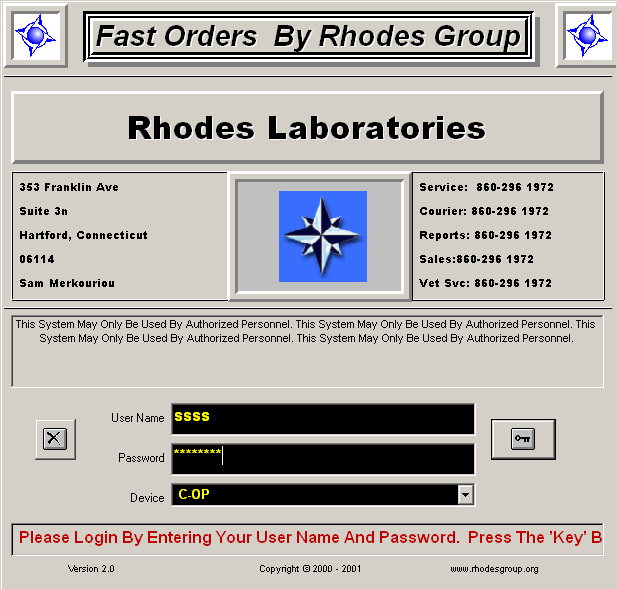
Sign-in
4. The cursor is positioned in the User Name data field.
5. Type a valid User Name and tab to move the cursor to the next field.
6. The cursor is positioned in the Password field.
7. Type the associated password and tab to move the cursor focus to the entry key button. (The button is outlined with dotted line to indicate that it is selected.)
• Press the Enter key after typing password also opens access to program.
8. If a Device locations(s) is assigned to the User in the User table then the Device Location field will be presented to the User. Please note that if only one device location is assigned then the User will not be presented with a choice and the device location will be defaulted to the assigned location. The User also may enter a device and User location in the format of DevLoc-UserLoc. The device location can be assigned to the User in the FO_Users (devicelocation) field. The format is DeviceLocation-UserLocation. The User location can be assigned in the (Userlocation) field of the same table. A single code is assigned. We recommend that all Users must be assigned at least one Device/User Location pair.
9. Press enter to activate (key) button. The Patient Selection window opens.
Fast Orders employs a 2 level security access comprised of a User Name and Password. These items must be defined in the database tables prior to access to the actual program. It is recommended that each User have a unique security for tracking purposes. The User Name and Password are not case specific. The system will retrieve the User Name logged in the Windows environment on the computer system the Platform is running for this User.
Entry Group Code
The entry group code is an arbitrary value utilized to indicate that the User belongs to a User group that does similar entry. The FO_Users table is utilized to record this value in the (entrygroupcode) field. We recommend that the entry group code is the minimum number of characters possible no more than 3-5 characters long. The reason for this is that the entry group code is used to prefix the internal patient id for each patient.
Typically, entry group codes are created to group User together in central processing, each client, or each collection facility or nursing home.
The system will also use this code to know which physicians and custom test groups it should display for a User.
Inquiry Group Code
Used to know what test results to display for a User. Typically set the same as the Entry Group Code. To set default, use the (inquirygroupcode) field in the FO_Users table.
Device Location
The default setting for this entry is the in the FO_Users (devicelocation) field. This is an arbitrary code that represents the device the User is using.
User Location
The default setting for this entry is the in the FO_Users (Userlocation) field. This is an important setting that the system uses identify the User location. The system uses this setting to drive packing lists and other reports.
If a User belongs to one or more device and location pairs the FO_Users (devicelocation) field should be set to contain multiple value pairs separated by a vertical bar, such as:
DeviceLocation-UserLocation| DeviceLocation-UserLocation|….
These will in turn be displayed for the User to choose from at the login screen.
Default Search Type
This setting is created in the FO_Users (defaultsearchtype) field and typically is set to “AUTO”. This setting represents the item that will be displayed for the User on the top of the screen when searching for a patient. Other options are:
1. AUTO
2. NAME
3. SSN
4. PHONE
5. DOB
6. ACCESSION
7. REQ.ID.
8. Lab MR#
9. RECENT PTS
10. Your ID
11. LAB ACESSION
12. INTEGRATED (Search)
Deactivate Date
This field, deactivatedate, in the FO_Users table allows you to deactivate a User. When set to a valid date, it’s evaluated by the system to warn the User they do not have access to the application.
This field, permgroup, in the FO_Users table allows you to set the security and rules engine parameters for this User. It’s a critical field and must contain a valid User group as created in the FO_PermGroups table. A permission group contains a list of keywords, or permissions, that cause the application to apply a set of rules for a User. These permissions are found in the FO_Permcodes table and are utilized to assemble a group in the FO_PermGroups table.
Keyboard Controls
- Arrow buttons - Left and right move cursor in like direction within a data field; up and down are non-functional.
- Tab - Moves cursor to next point of focus (button) or data field
- Backspace - Deletes one character at a time to the left of the cursor.
- Delete - Deletes one character at a time to the right of the cursor.
- End - Moves cursor to end of current data field entry
- Enter-Moves cursor to the next point of focus
- Home - Moves cursor to beginning of current data field entry
- Page Up / Page Down - Non-functional.
- Hot Keys: Underlined letters in Buttons and Field names allow the User to navigate to that control by pressing the ALT key and the underlined letter at the same time.
- Camera- This button is present on many screen and provides User with ability to take a screen shot of current display.
Screen Controls
- Buttons
- Click with the left mouse button to activate, or use the Hot Key assigned to it.
- Spread Sheets
- Several screens support spreadsheets that display row and columns of information.
- Some of these allow the User to sort by column by pressing on the heading.
- Some allow the User to edit fields in a column.
- A row generally can be highlighted by clicking on it and un-highlighted by pressing the space bar when highlighted.
- Drop Down (combo box) Fields
- Allow the User to fill a field by using the arrow on the right hand button to pick from a selection.
- Typically they show many fields but select only using one.
- Some support hover over to display additional information such as the coded element of a description.
- Entry Fields
- Allow the User to enter information.
- Yellow fields are mandatory.
- Blue fields are important entry points.
- The TAB key is used to navigate between fields.
- Hot keys assigned to fields may also be used to access them.
- The Mouse may be used to click the cursor in a field.
- Semicolon is override entry for some mandatory fields so process is not stopped when information is missing. The value is not stored.
- Mask Controls
- Allow the User to format the entry for a field.